How can you build a dog agility course for under $50?
With just a little bit of effort, you can build your own quality dog agility equipment for a fraction of the price.
All of these pieces of equipment are able to be used indoor or outdoor, taken apart for transportation, and adjusted to preferred size of each owner. Alterations for specific use cases will be discussed at the end.
Here is a link to official dog agility website for course design guidelines. I can’t say that I follow these perfectly, but I did use them for some general guidelines. Feel free to alter your design to fit regulations exactly.
It’s best to watch the video above to see the construction of the pieces, but below you will find the detailed lists with some suggestions.
What you need
The following is a breakdown of everything you need for the different pieces of equipment. Prices may vary by location and time, but this is what I paid for them and where I got them.
Harbor Freight:
- PVC Pipe Cutter = $6.79
Home Depot:
- 100 feet of PVC40 ½ inch (comes in 10 pieces, 10 feet each) = $18.70 (discount if you buy 100 feet or more) = $0.19/foot
- “T” joints = $0.54/piece
- 45-degree joints = $0.75/piece
- Couplers = $0.44/piece
- Endcaps = $0.38/piece
If you want permanent fixtures, or want to glue certain parts together, you can also get some PVC cement to connect these pieces. I found some for about $3.50 at Walmart.
Disclaimer: I do not represent or make recommendations for any of the above stores. They are just the stores where I bought my supplies.
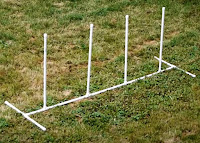
Weave Pole
This list will make a weave pole with 4 poles. It is measured and built so that the pole spacing will remain the same if you lay two weave pole builds end to end. You may alter the build to make more poles, but the farther away you make the feet, the more unstable the structure is. Having the feet in the way of your dog might not be perfect, so these should mostly just be used for casual use or practice while traveling.
PVC
8.5” x 2
12” x 4
21” x 3
30” x 4
PVC costs: 20.67 feet = $3.93
Joints
“T” joints x 6
Endcaps x 8
Joint costs: $3.24 + $3.04 = $6.28
Total Cost: $10.21
Hoop Jump
The hoop isn’t a perfect circle, but this is probably the best you can expect for PVC construction. The height is adjustable by changing where the hoop connects to the poles on either side. feel free to adjust the size of the hoop to your liking to make it more challenging.
PVC
12” x 1024” x 2
4.5” x 4
2” x 4
6” x 4
PVC costs: 18.17 feet = $3.45
Joints
“T” joints x 6Couplers (connectors; through and through) x 4
45-degree joints x 8
Endcaps x 6
Joint costs: $3.24 + $1.76 + $6 + $2.28 = $13.28
Total Cost: $16.73
Adjustable, Fall Away Bar Jump
The jump bar was made so that the bar itself can fall away off the back if the dog is unable to clear the jump. This should make it safer than solid bars. Also, make sure the dog always jumps with the bar on the side farthest way from where your dog is jumping from. Otherwise, the fall away feature won’t help. One length has to be a solid connection for structural integrity. I recommend making your lowest jump level a solid connection.PVC
12” x 636” x 1
39” x 1
6” x 8
2” x 10
PVC cost: 17.92 feet = $3.40
Joints
12 “T” joints x 1216 endcaps x 16
Joint costs: $6.48 + $6.08 = $12.56
Total Cost: $15.96
What does it cost to make everything?
To get PVC cutter and make 1 of each piece of equipment, total cost: $49.69.To make the exact set up I made in the video (3 weave poles, 1 bar jump, 1 hoop jump), total cost: $70.11.
Total length of PVC pipe used for exact setup shown in video: 98 feet, 1.2 inches (1 foot, 10.8 inches of PVC left over from the 100 foot purchase)
Tips
- Make sure to insert PVC pipes firmly into the joints. If fully inserted the connection is normally pretty strong.
- Use a rubber mallet if you don’t have the physical strength to push the PVC pipes into their fittings. You can also use something like a small piece of wood across the palm of your hand to when pushing the ends of pipes to get them in place so they don’t dig into your palm.
- Using rubber or silicon coated gloves can really help give you leverage when pushing and pulling on PVC pipe.
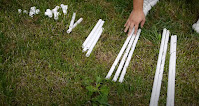
- Cut everything that you want to make first. If you cut all your pieces before you begin, it makes it much quicker to just put everything together without stopping to cut each piece.
- If you need multiple pieces of the same length, carefully measure 1 piece, then use that piece to eyeball the rest. As long as you are an accurate cutter, all your pieces will turn out the same length, and you only had to measure the first one.
- End caps aren’t absolutely necessary, but they are recommended to keep water from getting into the pipes
Alternative setups
All of these pieces can be built and used with no glue at all. This also makes them easy enough to break down for storage or travel. But here are some ways to make the equipment work better for you depending on what you want to use it for.Permanent setup
If you don’t plan on breaking these down ever, then I recommend gluing every connection. This will reduce the chance of things falling apart or coming loose. It will also help keep moisture out of the pipes, and will make it easier to move things around (less risk of things falling apart while being moved when the parts are glue together).Keep in mind, this will also make it hard if you want to transport them anywhere. All pieces are a bit bulky when set up, especially the weave poles, which are about 8 feet long, 2 feet wide, and 2.5 feet tall when fully constructed.
DO NOT glue pieces that may need to be adjusted for height, such as with the hoop jump, unless you never plan on changing the height.
Maximum mobility
If you need to travel with these or need to break them down as small as possible for storage, do not glue any of the parts together. This will allow for the course to be broken down fully. You can fit most, if not all materials in something like a tall army-type duffle bag, baseball bag, etc.It’s recommended to somehow separate all the pieces that go with each piece so that they don’t all get mixed together. This might mean putting all the pieces for one piece of equipment in a trash bag, and then putting that trash bag in a duffle bag. You don’t have to do this, but it makes putting them back together much quicker.
You may also want to put a quick sketch or picture of how they go together in there. Even better, number the pieces with a sharpie and then number your picture or sketch so that you can quickly assemble everything again.
If you want maximum portability, you can even cut the long sections in half and then reconnect them with a coupler. This will allow you to break the long sections (such as the poles in the weave poles) down into smaller pieces for easier transportation. It will make initial construction and set up a little longer however.
The downside of using no glue is that pieces can slip apart when moving the obstacles or loosen a bit over time. But by shortening some of the long pieces, you could realistically get the entire set up to fit into a large duffle bag. A complete breakdown will require some time to disassemble and then reassemble, but it is possible, and there shouldn't be any individual pieces longer than about 2 feet or less.
Somewhere in between
You can glue certain parts together, but not everything. This is what I did. I want to have the ability to break down the agility course to transport to another location easily, but I don’t want to reconnect every connection, and I want the pieces to hold together a little bit better when moving them around.I glued all of the feet construction together so that they won't fall apart, but did not glue them to the bottom of the poles so that they can still be taken off. I also glued the vertical poles from the weave poles to the T joint at the bottom. This allows you to pick up the vertical poles to move the piece with less risk of poles slipping out of their joints. I did not glue the horizontal pieces going into the T joints so I could still easily break it down for storage/travel.
Basically, look at your set up. Whatever you decide you will never take apart, even for transportation, you might as well glue together to help stability.
Explore on your own
Now that you have a good feel for how to create thing like this, and the tools to do it, you can experiment with many other kinds of obstacles. I would avoid making load-bearing obstacles with these materials, but for other equipment the sky is the limit!Get creative with it. Post your creations below. I’m willing to bet you can come up with better or more creative versions of these and more. However, it’s merely a theory.


This comment has been removed by the author.
ReplyDeleteThis comment has been removed by the author.
ReplyDeleteI crunched the numbers so that as long as the measurements/cutting is precise you can theoretically use only six instead of ten 10" poles. Below is the breakdown of which cuts should be divided up by poles (marked alphabetically) to have minimal waste and preserve as much of a single leftover as possible (you should end up with a single 37.5" [3' 1.5"] piece leftover).
ReplyDelete-WEAVE POLE-
A) 8.5” x 2
B) 12” x 4
C) 21” x 3
D) 30” x 4
-HOOP JUMP-
E) 12” x 10
F) 24” x 2
G) 4.5” x 4
H) 2” x 4
I) 6” x 4
-FALL AWAY JUMP BAR-
J) 12” x 6
K) 36” x 1
L) 39” x 1
M) 6” x 8
N) 2” x 10
------------------
10 ft pole = 120 inches apiece -
1st pole: ½ A + B + C = 119.5” | 8.5” (x1), 12” (x4), 21” (x3)
2nd pole: D = 120” | 30” (x4)
3rd pole: E = 120” | 12” (x10)
4th pole: F + J = 120” | 24” (x2), 12” (x6)
5th pole: I + K + L + N = 119” | 6” (x4), 36” (x1), 39” (x1), 2” (x10)
6th pole: ½ A + G + H + M = 82.5” | 8.5” (x1), 4.5” (x4), 2” (x4), 6” (x8)
You forgot blade curf in those calculations. But most of them can be alleviated by subbing 1 size smaller piece per stick. 3rd stick needs to swap 1x 12" for a 8.5" and a 2". 4th pole needs to swap 1 12" for a 6" and 2x 2". But it is made up in the remainder of the 6th stick. As for the 2nd pole they will just be about 1/8" shorter than planned.
DeleteThank you for your hard work and detailed instructions.
DeleteThis is great. I'm willing to bet if you put your mind to it, you could even find a way to utilize that ~3' of leftover PVC to improve on the existing design and have nothing left over. What's great about this in general is that once you get the hang of it, you have the tools and ability to alter any design to fit your needs, or create all new designs with a little bit of planning.
ReplyDeleteSo cool
ReplyDeleteSuccessfully assembled today and my pup enjoyed it! Thank you for the detailed instructions.
ReplyDeleteWith inflation, total cost came out to $120, but still well worth it!
Great to know with inflation! Thank you!
DeleteYou can also color code each obstacle with different colored tape. Then if the pieces get mixed up, it's easy to sort.
ReplyDelete